Did You Know ???    Tips and Tricks     SEO     Blogspot    Wordpress     MORE
: : : EXHANGE LINK : : : Mbah Dukun Bagong | | On-Idea | | Aceh Software | | Aceh Zone | | Menjelma  | | Terselubung Sekali 
Showing posts with label Blogspot. Show all posts

May 07, 2011

Hiding Border / Edge Line Image

Ponerah- On certain templates, when you upload a picture post, will appear line at the outer image. The function of this border is to create a boundary image with the contents of posts and also to make the picture more unique.

But not everyone liked the border on the image. If you are interested in the tricks to hide the image border, you can follow the steps below.

Do the following:

1. Login to your blog account
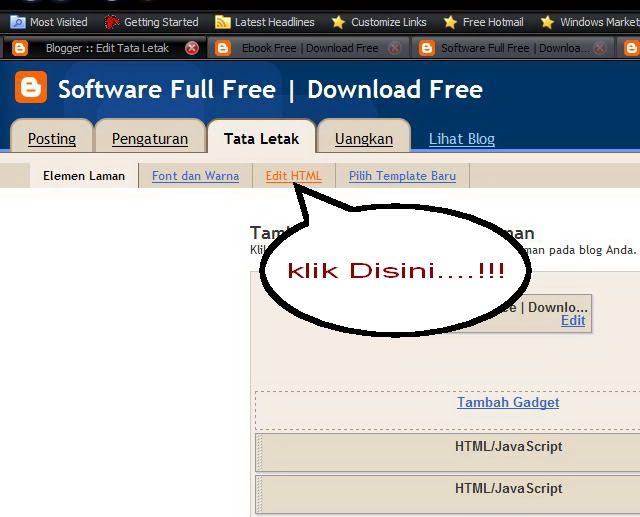
2. Choose a design and click Edit HTML
3. Search codes .post img or .post-body img

As the example below
.post img {
padding: 1px;
margin: 0px 15px 15px 0px;
border: 1px solid #ffffff
}

All you have to remember is that each different template code. So you need to change is the number 1 on the border code into the value 0

As the example below
.post img {
padding: 1px;
margin: 0px 15px 15px 0px;
border: 0px solid #f0f0f0
}

4. Save Template


Hopefully helpful
Success for us all
Read more »

May 02, 2011

Creating Zoom Effect Image

Ponerah- Image zoom effect could be an attraction that can be used on the page of a blog. In addition to beautify the appearance of the blog, also can make the post more interesting with the picture that will automatically expand when the pointer is directed at the picture.

If you are interested in this trick, you can follow the steps to create the zoom effect image below:

1. Login to your blog
2. Select Layout and click Edit HTML
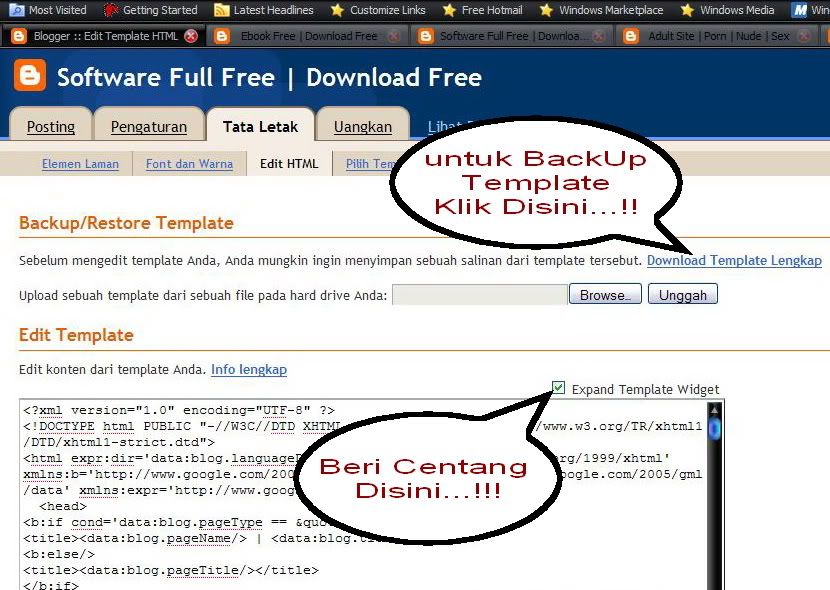
3. Check the box "Expand Widget Templates"
3. Find this code ]]></b:skin>
4. Copy the code below and enter the code above ]]></b:skin>


.zoom:hover{
-moz-transform:scale(1.98);
-webkit-transform:scale(1.98);
}

5. Then save template
6. After that go on blog postings and select edit HTML
Example usage code in posts:

<div style="text-align: center;">
<img class="zoom" src="https://blogger.googleusercontent.com/img/b/R29vZ2xl/AVvXsEhPMNFIT_fSxfV6_Sexd2wt5im6XkhX1kehVpu-esrS0KE1vYUOW10ddvoeVmiH9FrKU13wlhort_YniOUKH60HzjRALFxaS1uAta_eeImphhaqE67WPHzDju8ZJm2pjTS0mP3sHt8l0pY/s320/SAZLINA_COMP.gif" width="100" /></div>

The results


Note:
Green color, code for the zoom size image
Blue code command to enlarge image, Enter code if you want your picture zoom


Good luck.
Success for us all
Read more »

April 30, 2011

Creating Widget a Tag Cloud (tag cloud) On the Blog


Follow the steps of manufacture :

1. Login to your blog

2. Choose design

3. Add a gadget Html / Java script

4. Enter the code below


<embed allowscriptaccess="always" bgcolor="#FFFFFF" flashvars="tcolor=0x000000&amp;mode=tags&amp;distr=true&amp;tspeed=100&amp;tagcloud=&lt;tags&gt;


&lt;a href='http://ponerah.blogspot.com/search/label/SEO'style='12'&gt;SEO&lt;/a&gt;


&lt;a href='http://ponerah.blogspot.com/search/label/Blogspot'style='12'&gt;Blogspot&lt;/a&gt;


&lt;a href='http://ponerah.blogspot.com/search/label/Did%20You%20Know'style='12'&gt;Did You Know&lt;/a&gt;


&lt;a href='http://ponerah.blogspot.com/search/label/Computer'style='12'&gt;Computer&lt;/a&gt;


&lt;a href='http://www.free-jquery-templates.com/free-jquery-templates.php'style='12'&gt;Free Jquery Templates&lt;/a&gt;

&lt;/tags&gt;" height="230" id="tagcloud" name="tagcloud" quality="high" src="http://www.roytanck.com/wp-content/plugins/wp-cumulus/tagcloud.swf" type="application/x-shockwave-flash" width="300&quot;"></embed>

Notes :
Replace the blue color code for the background
Replace the color code red for text
Orange color for links
Brown color to name link
The green color to height and width


Good luck.
Success for us all
Read more »

April 29, 2011

Adding A Widget Under The Header

Ponerah- The room is empty on the blog has always been a problem faced by blog user's. Because each blog user's always wanted to display their blogs become more beautiful and perfect in the eyes of visitors.

Blogs are beautiful and comfortable making the viewer to linger on in the blog, supported with quality content and informative content.

The addition of the widget header on the blog of course you can use to maximize the placement of the contents of your post.

Here's how adding a Widget under the header

1. Log into your blog account.

2. Choose layout.

3. Then select edit HTML.

4. Before you add this element, you should backup the template. and if something goes wrong we can revert to the previous template.

5. Find similar code like this:
<b:section class='header' id='header' maxwidgets='1' showaddelement='no'>

6. Delete the code above, then replace with this code:
<b:section class='header' id='header' preferred='yes'>

7. Save the template

See on the page elements will appear a new page element.


Hopefully helpful
Success for us all
Read more »

April 28, 2011

Create Table Of Contents In Accordance With Label

Ponerah- List of contents on each article posted is very useful to help visitors of your blog / site to find what is sought by visitors. So that visitors do not find it difficult when they're on our blog page, so you must provide a table of contents.

for easier again, give the table of contents in accordance with the label in blog / your website.

I will give you tricks to make a list of contents according to the label on the content of your post. Hope you can help.

The trick is as follows.

1. Login to your blog, and then click design, and add the gadget> HTML / Javascript.

2. Copy and paste the following code in the gadget HTML / Javascript. then save

<script style="text/javascript"> var numposts = 500; var standardstyling = true; </script> <script type='text/javascript' src='http://gecokkkk.googlecode.com/files/label-post.js'></script> <div style="overflow:auto;width:280px;height:200px;padding:10px;border:1px solid #eee"> <ul> <script src="http://ponerah.blogspot.com/feeds/posts/default/-/SEO?orderby=published&alt=json-in-script&callback=showrecentposts&max-results=100"></script> </ul> </div>

3. Then save and see the results

Note:
width: 280px is the width of the wheel;
height: 200px is the height of the wheel;
bold red text (SEO), it is the name of a label or category. Replace with your label.

Good luck.
Success for us all
Read more »

Make Action In The Text

Ponerah- This post I will give you a little trick about beautifying your blog using the text.

You ever pay attention to your blog / website that posts the text moving right, left, up, down, and others.

Do you know how to make it?

If you do not know, please see some examples of using HTML text to beautify your blog.

Its usage is very easy, you just insert the code into the edit HTML in your posts.

Follow the code below:

Moves to the Right

<marquee direction="right"><span style="color: rgb(255, 0, 0); font-weight: bold;">Moves to the right</span></marquee>

Example
Moves to the Right


Moving to the Left

<marquee direction="left"><span style="color: rgb(255, 0, 0); font-weight: bold;">Moves to the right</span></marquee>

Example
Moving to the Left


Moves to the right and left

<marquee direction="right" behavior="alternate"><span style="color: rgb(255, 0, 0); font-weight: bold;">Moves to the right and left</span></marquee>

Example
Moves to the right and left


Slowly Moves to the right

Move Slowly To the right: Note: scrolldelay determine the value of fast or slow
Direction = determine the direction of movement

<marquee direction="right" scrolldelay="200"><span style="color: rgb(255, 255, 0); font-weight: bold;">Slowly Moves to the right</span></marquee>


Example
Slowly Moves to the right


Move to the left and right may be terminated

<marquee direction="left" behavior="alternate" scrollamount="2" onmouseover="this.stop()" onmouseout="this.start()" width="95%"><span style="color: rgb(255, 0, 0); font-weight: bold;">Move to the left and right may be terminated</span></marquee>

Example
Move to the left and right may be terminated


Move up

<marquee align="center" direction="up" scrollamount="2" onmouseover="this.stop()" onmouseout="this.start()" height="100" width="95%"><span style="color: rgb(0, 255, 0); font-weight: bold;">Move up</span></marquee>

Example
Move up


Move up and down

<marquee align="center" direction="up" behavior="alternate" scrollamount="2" onmouseover="this.stop()" onmouseout="this.start()" height="100" width="95%"><span style="color: rgb(255, 0, 255); font-weight: bold;">Move up and down</span></marquee>

Example
Move up and down


Moving image to the right

<marquee direction="right"><img 
src="https://blogger.googleusercontent.com/img/b/R29vZ2xl/AVvXsEgb3W5dG9Q0hy2gq6mbW42YP6MwFzxHdASLkreXPeGQ0CVuR8oiFgDQfyPcTQGkoXCTG_D1EAYpCDmkqgWoCvY1t09_iW8oA8okTWH1MkTOsNkbaFDDZ8P3i-FiszzM27JICkUBStU39D0a/s1600/ponerah.gif"
 /></marquee>

Example


Hopefully useful. Success for us all
Read more »

April 25, 2011

Make Auto Select All Text

You often see a line of text in the the column web site and if you click on the text ,the text will automatically be blocked .

How do I manufacture?

It's easy, you just need to add attributes onFocus = "this.select ()" on the textarea you want to create

Examples:

<textarea onFocus="this.select()">the contents of your text</textarea>

Results


Good luck
Read more »

April 20, 2011

Creating Widgets Recent Comments

Ponerah- Actually, to display the latest comments added already exist in the default gadget blogspot. But many of the bloggers are reluctant to use it as a less attractive appearance.

The addition of these widgets to display the contents of blog visitors comment on our posts. therefore we need to install this widget for we know that the posts we had no response from visitors to the blog.

If you want to install this widget, please follow these steps :

Log In to your blogger dashboard ---> Click Layout ---> Add a Gadget ---> Choose HTML / JavaScript

Then input the following code
<ul><script style="text/javascript">
function showrecentcomments(json) {
for (var i = 0; i &lt; 5; i++) {
var entry = json.feed.entry[i];
var ctlink;
ate = entry.published.$t; var cdyear
var comment d= commentdate.substring(0,4);
ring(5,7); var cdday = commentdate.substr
var cdmonth = commentdate.subs ting(8,10); var monthnames = new Array(); monthnames[1] = "Jan";
r"; monthnames[5] = "M
monthnames[2] = "Feb"; monthnames[3] = "Mar"; monthnames[4] = "A pay"; monthnames[6] = "Jun"; monthnames[7] = "Jul"; monthnames[8] = "Aug";
hnames[12] = "Dec"; i
monthnames[9] = "Sep"; monthnames[10] = "Oct"; monthnames[11] = "Nov"; mon tf (i == json.feed.entry.length) break; for (var k = 0; k < entry.link.length; k++) {
= ctlink.replace("#", "#comment-"); va
if (entry.link[k].rel == 'alternate') { ctlink = entry.link[k].href; break; } } ctlin kr ptlink = ctlink.split("#"); ptlink = ptlink[0]; var txtlink = ptlink.split("/"); txtlink = txtlink[5];
pttitle.link(ptlink); if ("conte
txtlink = txtlink.split(".html"); txtlink = txtlink[0]; var pttitle = txtlink.replace(/-/g," "); pttitle =nt" in entry) { var comment = entry.content.$t;} else if ("summary" in entry) { var comment = entry.summary.$t;} else var comment = "";
font-size:90%;
var re = /<s[^>]*>/g; comment = comment.replace(re, ""); document.write('<li>'); if (comment.length < 50) { document.write('<div style=
"background-color: #dcdcdc; border: #dcdcdc 1px dashed;margin-right:5px">' + monthnames[parseInt(cdmonth,10)] + ' ' + cdday);
document.write(' - ' + entry.author[0].name.$t + ' commented on');
} else { comment = comment.substring(0, 5
document.write(' ' + pttitle + ':</div>'); document.write(comment) ;0); var quoteEnd = comment.lastIndexOf(" "); comment = comment.substring(0, quoteEnd);
dashed;margin-right:5px">' + monthnames[parseInt(cdmonth,10)] + ' ' + cdday); document.write(' - ' + entry.author[0].name.$t + ' commented on'); document.write(' ' +
document.write('<div style="font-size:90%;background-color: #dcdcdc;border: #dcdcdc 1px pttitle + ':</div>'); document.write(comment + '...<a href="' + ctlink + '">(more)</a>'); } } document.write('</li>'); } </script> <script src="http://ponerah.blogspot.com/feeds/comments/default?alt=json-in-script&callback=showrecentcomments">
</script></ul> <noscript>You need to enable JavaScript to read this.</noscript>

Description:
** for (var i = 0; i &lt; 5; i++) { : Item 5 on this code, means showing ninimal comment number five can be replaced in accordance with the needs of the appearance of comments.
** background-color: #dcdcdc; border: #dcdcdc : This code is to display the color of the background comments. Also can be replaced with a color you like.
** http://ponerah.blogspot.com replace with your blog address


Good Luck
Read more »

April 19, 2011

Creating a Gadget under Blog posts

Ponerah- Many Bloggers are trying to create their own template as many limitations of existing templates. Especially for the original template from Blogger.com, a lot of limitations. Because it is the Master CSS attempt to make some tutorials that can improve an existing template. Or even extend the template you have.

This time I tried to give way to add a gadget or sidebar just below or above your blog posts, as you can see in the image below:


This time to make qu trying to make it easy for you guys. Notice how in the order listed below:
1. Open up your Dashbor Blog Layout menu and choose
2. Then click Edit HTML


3. Try to save your template first.
4. Check the box "Expand Widget Templates"


5. Find the code below:

<div id="main-wrapper">
<b:section id="main" showaddelement="no">

6. Fox becomes like this:

<div id="main-wrapper">
<b:section id="main" showaddelement="yes">

7. Save your Template
8. If you want to position element / gadget under the posts, do the following:

     * Add a gadget used to let you insert a gadget "HTML / Javascript"
     * Drag the gadget to the bottom of the box Postings "Blog Post" then the position asfollows:


Adding header element + Element below / above posts
The position of the first gadgets


Note:
In other cases this may be influenced by the type of template you use, the advertisements will always appear under the posts after you click Read More

9. Finally the last thing from everything above is "Done".
Read more »

How To Create a New List Of Labels

Ponerah- This time we will share about how to display a list of blog posts by category. Sure, if we create a blog that has many labels / categories, sometimes want to bring up a few posts / news / latest on each label somewhere.

Now we just created. Please go to your blog control panel and select Layout> Page Elements. Then, locate and click Add Element Javascript/HTML.

Inside this code :

<div style="overflow:auto; border: 1px solid #CCC; margin: auto; padding: 3px; width: 95%; height: 250px; background-color: none; text-align: left;"><script style="text/javascript" src="http://www.abu-farhan.com/script/daftarisiblogger/blogtoc-min.js"></script>
<script src="http://nameyoublog.blogspot.com/feeds/posts/default?max-results=9999&alt=json-in-script&callback=loadtoc"></script></div>

Replace the red code with your blogspot feed.
Read more »

April 18, 2011

Thumbnail Effect w / jQuery

Ponerah- I was checking out some nice flash galleries and came across an effect that I really liked. I thought I’d share this and maybe some of you can find it useful.
Klik Image If You Want View DEMO


Build the Foundation – XHTML

Our markup will be fairly simple, just an unordered three columned list.

<ul class="thumb">
 <li><a href="#"><img src="thumb1.jpg" alt="" /></a></li>
 <li><a href="#"><img src="thumb2.jpg" alt="" /></a></li>
 <li><a href="#"><img src="thumb3.jpg" alt="" /></a></li>
 <li><a href="#"><img src="thumb4.jpg" alt="" /></a></li>
 <li><a href="#"><img src="thumb5.jpg" alt="" /></a></li>
 <li><a href="#"><img src="thumb6.jpg" alt="" /></a></li>
 <li><a href="#"><img src="thumb7.jpg" alt="" /></a></li>
 <li><a href="#"><img src="thumb8.jpg" alt="" /></a></li>
 <li><a href="#"><img src="thumb9.jpg" alt="" /></a></li>
</ul>


Dress it Up – CSS

Pay close attention to the positioning properties between the list item and the image. We have to make sure that the hovered image must be on top of the other images, so this part is key.

ul.thumb {
 float: left;
 list-style: none;
 margin: 0; padding: 10px;
 width: 360px;
}
ul.thumb li {
 margin: 0; padding: 5px;
 float: left;
 position: relative;  /* Set the absolute positioning base coordinate */
 width: 110px;
 height: 110px;
}
ul.thumb li img {
 width: 100px; height: 100px; /* Set the small thumbnail size */
 -ms-interpolation-mode: bicubic; /* IE Fix for Bicubic Scaling */
 border: 1px solid #ddd;
 padding: 5px;
 background: #f0f0f0;
 position: absolute;
 left: 0; top: 0;
}
ul.thumb li img.hover {
 background:url(thumb_bg.png) no-repeat center center;  /* Image used as background on hover effect
 border: none; /* Get rid of border on hover */
}

Bring it to Life – jQuery

Basically all we are doing is animating the thumbnail’s size, absolute positioning coordinates (vertical alignment w/ css), and padding when we hover over. During this animation, we also switch the value of the z-index, so that the selected image stays on top of the rest.

$("ul.thumb li").hover(function() {
 $(this).css({'z-index' : '10'}); /*Add a higher z-index value so this image stays on top*/ 
 $(this).find('img').addClass("hover").stop() /* Add class of "hover", then stop animation queue buildup*/
  .animate({
   marginTop: '-110px', /* The next 4 lines will vertically align this image */ 
   marginLeft: '-110px',
   top: '50%',
   left: '50%',
   width: '174px', /* Set new width */
   height: '174px', /* Set new height */
   padding: '20px'
  }, 200); /* this value of "200" is the speed of how fast/slow this hover animates */

 } , function() {
 $(this).css({'z-index' : '0'}); /* Set z-index back to 0 */
 $(this).find('img').removeClass("hover").stop()  /* Remove the "hover" class , then stop animation queue buildup*/
  .animate({
   marginTop: '0', /* Set alignment back to default */
   marginLeft: '0',
   top: '0',
   left: '0',
   width: '100px', /* Set width back to default */
   height: '100px', /* Set height back to default */
   padding: '5px'
  }, 400);
});

View DEMO

Conclusion
It may not be as smooth as the flash version, but its definitely a neat effect. If you switch up the absolute potion coordinates, you can create various ways the hover effect pops out

Good Luck


Credit By sohtanaka
Read more »

Image Automatic Slider w/ CSS & jQuery

Ponerah- Image slider using HTML / CSS / Javascript, and leave a more interactive applications for the flash if needed. Slider html image will have a benefit in accordance with the SEO and also will make your site graceful.

Klik Image If You Want View DEMO

The Wireframe – HTML

Start with having a wrapping container div called main_view, and two sections nested inside called image_reel and paging. The image_reel will contain the sliding images, and paging contains the paging controls. Take a look at the image below for a visual.


<div class="main_view">
    <div class="window">
        <div class="image_reel">
            <a href="#"><img src="reel_1.jpg" alt="" /></a>
            <a href="#"><img src="reel_2.jpg" alt="" /></a>
            <a href="#"><img src="reel_3.jpg" alt="" /></a>
            <a href="#"><img src="reel_4.jpg" alt="" /></a>
        </div>
    </div>
    <div class="paging">
        <a href="#" rel="1">1</a>
        <a href="#" rel="2">2</a>
        <a href="#" rel="3">3</a>
        <a href="#" rel="4">4</a>
    </div>
</div>

Styling – CSS

Take a look at the comments below for an explanation of the styles.

/*--Main Container--*/
.main_view {
 float: left;
 position: relative;
}
/*--Window/Masking Styles--*/
.window {
 height:286px; width: 790px;
 overflow: hidden; /*--Hides anything outside of the set width/height--*/
 position: relative;
}
.image_reel {
 position: absolute;
 top: 0; left: 0;
}
.image_reel img {float: left;}

/*--Paging Styles--*/
.paging {
 position: absolute;
 bottom: 40px; right: -7px;
 width: 178px; height:47px;
 z-index: 100; /*--Assures the paging stays on the top layer--*/
 text-align: center;
 line-height: 40px;
 background: url(paging_bg2.png) no-repeat;
 display: none; /*--Hidden by default, will be later shown with jQuery--*/
}
.paging a {
 padding: 5px;
 text-decoration: none;
 color: #fff;
}
.paging a.active {
 font-weight: bold;
 background: #920000;
 border: 1px solid #610000;
 -moz-border-radius: 3px;
 -khtml-border-radius: 3px;
 -webkit-border-radius: 3px;
}
.paging a:hover {font-weight: bold;}

Setting up jQuery

For those who are not familiar with jQuery, do check out their site first and get an overview of how it works. I’ve shared a few tricks that I have picked up along the way, you can check those out as well.

Initial Step – Call the jQuery file

You can choose to download the file from the jQuery site, or you can use this one hosted on Google.

<script type="text/javascript"
src="http://ajax.googleapis.com/ajax/libs/jquery/1.4.1/jquery.min.js"></script>

Directly after the line where you called your jQuery, start a new <script> tag and start your code by using the $(document).ready event. This allows your jQuery code to run the instant the DOM is ready to be manipulated. The code you will be writing in the next few steps will all take place within.

$(document).ready(function() {
 //Code goes here
});


Bringing it to Life – jQuery

The following script contains comments explaining which jQuery actions are being performed.

* Setting up the Image Slider *
Start by showing the paging and activating the first link. Then we will calculate and adjust the width of the image_reel according to how many slides there are.

//Show the paging and activate its first link
$(".paging").show();
$(".paging a:first").addClass("active");

//Get size of the image, how many images there are, then determin the size of the image reel.
var imageWidth = $(".window").width();
var imageSum = $(".image_reel img").size();
var imageReelWidth = imageWidth * imageSum;

//Adjust the image reel to its new size
$(".image_reel").css({'width' : imageReelWidth});

* Setting up the Slider Function and Timer *
We first create the function for the slide event by itself (rotate). Then create another function (rotateSwitch) that will rotate and repeat that slide event (rotate).

//Paging  and Slider Function
rotate = function(){
    var triggerID = $active.attr("rel") - 1; //Get number of times to slide
    var image_reelPosition = triggerID * imageWidth; //Determines the distance the image reel needs to slide

    $(".paging a").removeClass('active'); //Remove all active class
    $active.addClass('active'); //Add active class (the $active is declared in the rotateSwitch function)

    //Slider Animation
    $(".image_reel").animate({
        left: -image_reelPosition
    }, 500 );

}; 

//Rotation  and Timing Event
rotateSwitch = function(){
    play = setInterval(function(){ //Set timer - this will repeat itself every 7 seconds
        $active = $('.paging a.active').next(); //Move to the next paging
        if ( $active.length === 0) { //If paging reaches the end...
            $active = $('.paging a:first'); //go back to first
        }
        rotate(); //Trigger the paging and slider function
    }, 7000); //Timer speed in milliseconds (7 seconds)
};

rotateSwitch(); //Run function on launch

* Hover and Click Events *
 In case the user wants to view the slide for a longer period of time, we will allow the slider to stop when it is hovered. Another thing to consider is we should reset the timer each time the paging is clicked. This will prevent unexpected slide switches and allow for a smoother experience.

//On Hover
$(".image_reel a").hover(function() {
    clearInterval(play); //Stop the rotation
}, function() {
    rotateSwitch(); //Resume rotation timer
}); 

//On Click
$(".paging a").click(function() {
    $active = $(this); //Activate the clicked paging
    //Reset Timer
    clearInterval(play); //Stop the rotation
    rotate(); //Trigger rotation immediately
    rotateSwitch(); // Resume rotation timer
    return false; //Prevent browser jump to link anchor
});

Final !!! Good Luck

View DEMO


Credit By sohtanaka
Read more »

Whois Ponerah

Followers

Supporting