


Ponerah- You can truncate blog entries so that only the first part of certain posts is displayed on the home and archive views. When you do this, a link will be placed directly after your excerpt, pointing the reader to the full content of the article.
You can find the More Tag button in the first row of the visual editor toolbar or by pressing Alt+Shift+T:
Using the More tag
1) Go to Posts -> Add New in your dashboard to create a new blog entry (this does not work with Pages).
2) Begin writing your post. When you decide that you want to cut it off, insert the More tag to split the post (mark where the excerpt officially ends). You will see the More Tag as such in the visual editor:

3) Finish writing your post.
4) Publish the post and view the front page of your blog. You should see your post effectively split using the More Tag. Note that the more tag is not displayed in post previews, since previews display posts in entirety, but the more tag will appear once the post has been published.
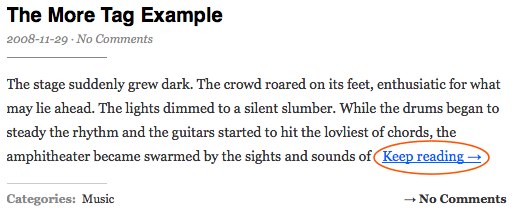
Click on the link, and you will be taken to the post in its full form. The front page of your blog should display the post similar to:
But wait, there’s more!
You can further customize the message that displays in the link to the full post content.
You will need to do this in the HTML view of your editor. Once you have changed to the HTML editor, look for this code:
<!--more-->To customize the message, simply add a space after
<!--more, and turn it into something like this…<!--more But wait, there's more-->The front page of your blog should now display your post as such:

Note: You will need to customize the message for each post. You cannot declare a global message that will take effect on each post of your blog that uses the More Tag.
Formatting Issues
If the More Tag is inserted after writing a post, formatting errors can occur. The issue occurs when you insert the More Tag using the visual editor, but it is actually placed within another HTML tag. As an example:
<strong>Oh man, this post is messed up.<!--more--></strong>The above will cause the rest of the posts on your front page (or in an archive) to be formatted as bold, sometimes including your sidebar contents. Not cool. It can also make the sidebar fall to the bottom of the page. To fix the issue, just place the More Tag on the outside of any pesky closing HTML tags, like so:
<strong>Oh man, this post is messed up.</strong><!--more-->
<strong>Oh man, this post is messed up.</strong><!--more-->
Make sure to go into the HTML view of the problematic post and move your More Tag to outside of any HTML tags (this includes div, strong, em, etc…).
Read more »

0 comments:
Post a Comment